
Coffee brewed, printer reset on deck!
I’m a huge fan of Canon printers. They’re user-friendly, reliable, and a breeze to maintain with genuine cartridges. However, the dreaded “ink absorber almost full” message can be a real headache. It throws up warnings initially, but eventually brings the printer to a screeching halt. Frustrating, right?
Taking it to a technician seems pointless when the cost might outweigh the printer’s value. And honestly, buying a new one isn’t ideal. This printer still performs flawlessly, thanks to genuine Canon ink that keeps the print head in top shape. So, resetting the ink absorber is the way to go for me!

Finding a Reset Solution (Proceed with Caution)
After some searching, I discovered a potential solution: resetting the ink absorber counter using a Canon service tool. Be aware that downloading third-party software can be risky.
Here’s my approach (use at your own discretion):
- Ensure strong antivirus protection on your computer before attempting any downloads.
- Understand the potential consequences. Resetting the counter might not be a permanent fix, and the printer may still require service.
- Consider the printer’s age. For a printer over 10 years old (like mine!), replacing it might be wiser in the long run. Canon printers are known for their longevity, especially with genuine ink cartridges. Using compatible cartridges can shorten the print head’s lifespan, as I’ve experienced before.
My experience (YMMV):
The reset worked for me, but I take no responsibility for its success on your printer. The ink absorber pad collects excess ink, so I placed my MP990 on a towel for potential overflow (which hasn’t happened). Thankfully, the printer continues to function flawlessly.
Resetting Your Canon MP990 Printer (Use with Caution)
Before you begin:
- Ensure your printer is turned off and both the power cable and USB cable are securely connected to your computer.
- Locate the Resume button on the control panel. It’s orange, shaped like a triangle within a circle, and positioned on the right side. This button also functions as the Stop button.
Reset Process:
- Power Up in Service Mode:
- Press and hold the Resume (Stop) button.
- While holding the Resume button, press and hold the Power button (on button). The blue light (or a different color depending on your model) should illuminate.
- Keep holding the Power button only.
- Release the Resume button.
- Press the Resume button twice. Some lights on the control panel might blink (depending on your model).
- Your printer should now be in service mode. You’ll need to use the Canon Service Tool software for further steps (instructions not covered here).

Important Notes:
- This process might not be a permanent solution and your printer may still require service.
- Downloading and using third-party software like the Canon Service Tool can be risky. Only proceed if you are comfortable with the potential risks.
- Consider the age of your printer. For models over 10 years old, replacing it might be a better long-term option.
The Canon Service Tool
Unfortunately, I cannot provide a direct download link for the Canon Service Tool software as its availability and legitimacy can vary. However, you can find it through online searches using terms like “Canon MP990 Service Tool Download.”
Important Note: Downloading third-party software can be risky. Make sure you trust the source and thoroughly scan any downloaded files with your antivirus software before running them.
Extracting the Software
The downloaded Service Tool file might be in a compressed format like “RAR.” To open it, you’ll need extraction software. Many free options are available online. Popular choices include WinZip and 7-Zip.
Once you have the extraction software, open the downloaded file and follow the on-screen instructions to extract the Canon Service Tool program.
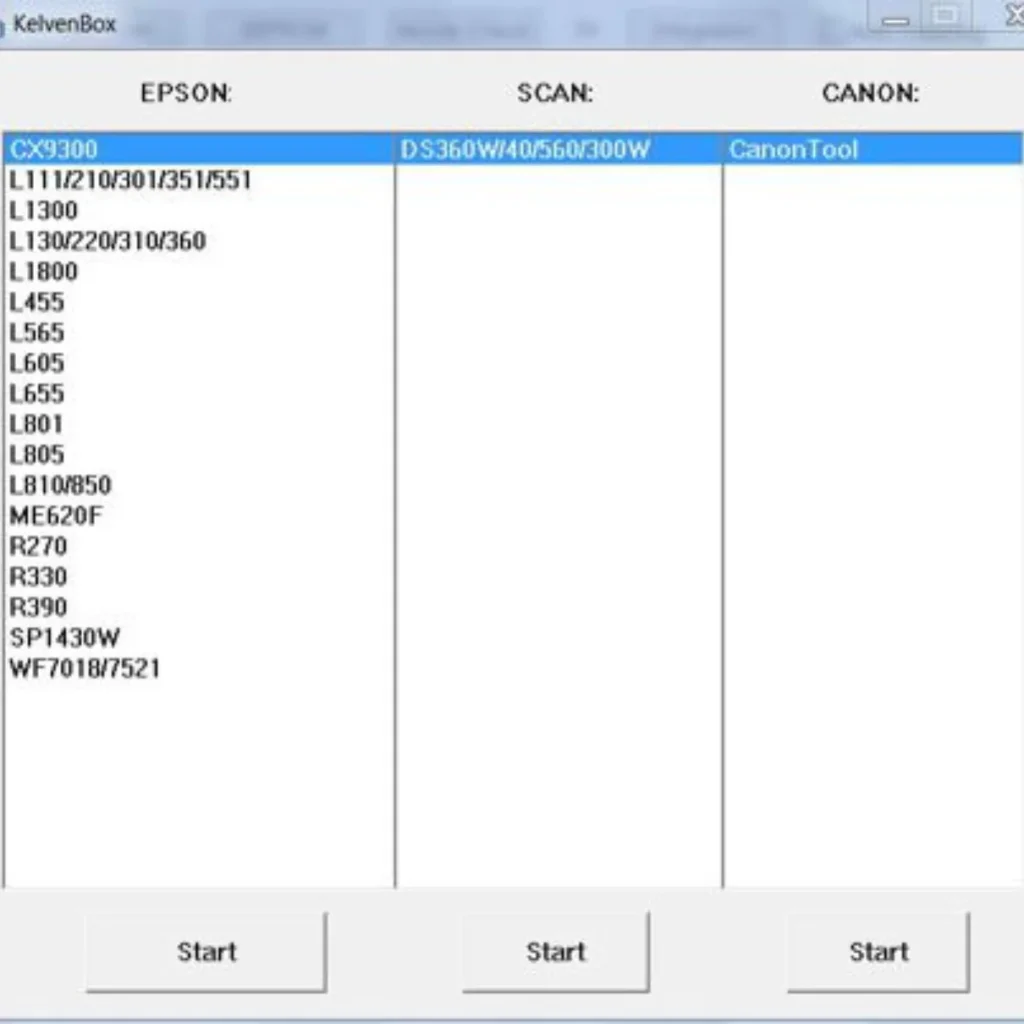
KelvenBox
The extracted files might include a program named “KelvenBox.” This is a third-party application that bundles the Canon Service Tool with adjustment programs for other printer brands. You can choose to use the Canon Service Tool directly from the extracted folder instead of running KelvenBox.
Remember, proceed with caution when downloading and using third-party software.
Using the Canon Service Tool (Disclaimer):
Before proceeding, understand that using unofficial software can be risky. Make sure you trust the source and have a recent backup of your computer.
- Launch the Service Tool: Locate the Canon Service Tool program within the extracted files (you might find it within a folder named “KelvenBox”). Double-click the program icon to launch it.
- Print EEPROM Information (Optional): In the Canon Service Tool interface, you might see a section labeled “Canon” or a similar category. Look for a button or option related to “EEPROM” or “Information.” Clicking this might allow you to print the current settings of your printer. This step is optional, but it can be helpful for reference.
- Prepare for Reset (Next Step): Ensure you have plain paper loaded in your printer’s cassette or rear tray. We’ll proceed with the reset process in the next step.

Resetting the Ink Absorber Counter (Use with Caution):
Now that you’ve (potentially) printed the EEPROM information, it’s time to reset the ink absorber counter. Locate the section labeled “Clear Ink Counter” or similar wording within the Canon Service Tool interface.
This section might display the current value of the ink absorber counter. Important: Resetting the counter does not replace the physical ink absorber pad. If the pad is truly saturated with ink, further issues may arise.
Here’s how to proceed (use your judgment):
- Check the Setting: The software might have a setting labeled “Main” or similar. This usually refers to the main ink absorber counter. Leave this setting on “Main” unless instructed otherwise by the specific Service Tool you’re using.
- Reset the Counter: Click the “Set” button associated with the ink absorber counter reset function. The Service Tool should initiate the reset process.
- Verify the Reset: The printer might automatically print a page showing the updated ink absorber counter value. This can confirm a successful reset.
Remember:
- Resetting the counter is a temporary solution and doesn’t address a potentially full ink absorber pad.
- Consider the age and condition of your printer. Replacing it might be a better long-term option for very old printers.

Set your County of Destination
Now you want to set your country of destination. Select your Region (4): ASA (Asia), AUS (Australia), BRA (Brazil), CHN China), CND (Canada), EMB (Middle East), EUR (Europe), JPN (Japan), KOR (Korea), LTN (Latin), TWN (Taiwan ), USA (United States), and then click ‘set’. Mine was ‘AUS’ for Australia.

Verifying the Reset and Powering Up:
- Optional: Re-print EEPROM Information: You can optionally print the EEPROM information again using the Service Tool. Compare the values before and after the reset. The ink absorber counter value should show a significant decrease or reset to zero.
- Close the Service Tool: Once you’re satisfied (or if you didn’t print the EEPROM information again), close the Canon Service Tool software.
- Exiting Service Mode: Press the Resume (Stop) button four times in quick succession. Then, press the Power (On) button once. The printer should turn itself off.
- Restart the Printer: Wait for at least 10 seconds. Then, turn the printer back on by pressing the Power button.
- Ink Absorber Message: If the reset was successful, the “ink absorber almost full” message should be gone.
Important Note:
A reset counter does not fix a potentially saturated ink absorber pad. If the pad is truly full, ink leakage or other printing issues might still occur. Consider replacing the printer if it’s very old or if the reset provides only a temporary solution.

After Reset:
Upon restarting your printer, you might need to go through a brief setup process, including language selection (mine defaulted to English).
Disclaimer and Gratitude:
This guide is intended for informational purposes only. Resetting the counter is a temporary solution and may not address underlying hardware issues. Consider the age and condition of your printer before proceeding.
I hope this guide was helpful! I found the information after extensive searching and wanted to share it with others.
Image Credits:
The included photos are mine. Happy printing!


